Tuesday, June 26, 2012

Bruise Blog


                          Welcome to the Bruise Blog!


 The funny part of this is that these are actual pictures and texts sent between Julie and I.  I will often open a text to find a photo of a bruise, cut, or scrape with a funny little note.  So before I put of our next beautiful project....and I mean beautiful, I hope you will get a laugh about these weekly sometimes daily banters and photos between Julie and I.


I'm adding the Protective Equipment and Clothing Page from the contractors licensing manual as the first photo because I believe no matter how
careful I am I will end up with a bruise somehow, somewhere on my body.   So as much as I believe  in safety first ( I really mean that, Pat) I will end up with some sort of cut or bruise. 


"I'm bleeding already and all I have done is showered and had breakfast. 
How does this happen?"


        "No clue on this one either either."  

(literally sent with in minutes of each other


 "How do you get a bruise on the tip of your big toe? "


"This ones new hit the wall coming out of the shower."


"Tops them all!"
This was the corner of a piece of tile that just dropped.  Julie heard me from inside laugh and say that gonna leave a mark...and it did.


 "Pretty Pedicure, right?"


"Different toe, and polish."


We do beautiful work and have a great time doing it!!!!!!  " These are the most beautifully manicured toes in construction."


 Side note,  the handle of the drill hit me in the hip.  I can't post that picture but it delivered a real kick.....


Photo taken of me putting up Christmas lights.  My neighbor Matt, took from his front window. Posted to Facebook.  Julie made him take it down immediately so I wouldn't "get in trouble" with Pat....I'm not supposed to be on the roof.  But the Christmas light have to get up so what's a girl to do?
By the way no bruises were acquired..this time.  It was a cold rainy day in December, blah.


Next up Julies beautiful new fireplace....

Tuesday, May 22, 2012

I Can't Believe it's Not Tile.


Six months ago I got a wild hair about my laundry room floor. I usually have a wild hair about something in my house. Remember when I said on any day my husband could come home from work only to find a wall torn down or put up.  A few years ago he was in Europe for the week and I laid new sod in the back yard....SURPRISE. Anyway, the floor in my laundry room was old ugly linoleum.  It had to go and had to go that day. I ran to Home Depot to buy tile only to realize I would have to  rip the old floor up to make it the right height. I started researching different options and found Stain Master peel and stick linoleum tiles. These thing are great. You need a ruler, a straight edge, and utility knife.  They are thin but sturdy and look just like tile. There is even a grout line.
I bought the flooring and brought it home.  Here's the great thing.  You measure, you cut and you stick it down.  Then you grout it,  it looks like tile. It's amazing really. This could be a long story about tiling but it's not, it's a long sob story about why I don't have this floor in my laundry room anymore and why I still love this stuff.

  I finished the laundry room it was beautiful, updated, freshly painted really nice.  We bought the house at the beach a few months later.  What to put on the faux brick linoleum in the bathroom....peel and stick tile right? I had just done the laundry room.  Julie had just done her pantry. That's Julie cutting the flooring.  Note the pedicured foot holding the straight edge.
  Look at that floor. I can't believe it's not tile.

Fast forward,  the beach house is almost done.  So I took the kids for a relaxing three days.  It was a beautiful weekend at the coast, no rain, no wind, and a lot of sun.  We had a great time.  I finished small projects the kids played.  We took off on Sunday afternoon.  My son, Matt, immediately fell asleep...weird.  Weird is right.  He ended up with a very bad flu,  high fever and guess what? A lot of vomiting.  It's important to note that my son is not a toddler.  He's 13 and 6 feet tall.  So more of a man boy really.  If he were to fall on me I might be crushed ;)

The way I look at vomiting in my house is like head lice.  I start washing everything. Even our bedding which is upstairs from his room. But wash it all is what I did while Matt slept, threw up, and slept some more. I washed the whole house.

Now what does this have to do with the laundry room floor?  Everything.  I'm walking down the stairs with an armful of laundry and what do I step in?  Not vomit, not poo. I stepped in a huge puddle of water!   @#$%^&*   I walked around the corner and found the laundry room completely flooded.  Water down the hall, into the bathroom and flowing like crazy.  A hose in the washing machine had literally exploded.  Someone asked me the other day what I couldn't fix. Washing machines is what I should have said.

I had every towel  in my house sopping it up, with Horizon Restoration on their way. In come the fans, out comes the floor... big tears, no joke. The next thing I know, they are starting to tear up my subfloor, then stop and say, "This looks like it has asbestos in it."   !@#$%^*  again.   Seriously another layer of old, ugly, orange linoleum.  I should have known.   It took a week to dry out and have the Hazmat team in the house.  (Asbestos is another thing I can't fix and won't mess with).
Remember when I was talking about the level of the floor? Well it comes's back into play. They took out two sheets of particle board and 2 layers of linoleum. Now the floor is too low to use my thin awesome peel and stick tile...rats.


Problem solved by continuing the Pergo from the hallway into the laundry room.  I think it looks nice and there isn't a difference in floor height.  Pergo goes in about as easily as the sticky tiles so it tuned out OK.  It's not the floor I had, but it will do.  I'm hoping for no flooding though as Pergo will soak up water like a sponge.


How much is that doggy in the window?


Wednesday, May 16, 2012

A New Shower Head;)

Sunday was Mother's Day.  What did we do, you wonder?  Well, my husband and I took off for three days to stay at the beach.  I'll admit I felt a little bad on Sunday at 2:00 when I wasn't quite ready to come home.  The weather was great,  we ran, we laughed, we walked on the beach,  we hung out with a bachelorette  party at the bar until it closed.  Really it was a Mother's day to remember.
One of the greatest things about the house other than being at the beach is the downstairs shower.  First of all, I got to tile again, second, the glass door is really pretty, and third, it has a massaging shower head that is ideal after a long day of remodeling or a great run.  So I was thinking to myself why in the world have I not done this at my own house?    It's about a 30 minute project including the drive to and from Lowe's. 

After having a great Thai dinner with my kids and husband, receiving some very thoughtful mother's day gifts, and a card that made me cry, I ran to Lowe's and grabbed a new Moen shower head.  There have to be 50 types and brands to choose from, all you have to do is look at the features and decide.   The  one I bought  has 5 settings and  a 5 foot hose.  The shower I put it in is large, so it is also useful in cleaning.

Honestly this  is one of the faster projects you can do.  All you need is pipe tape and a towel, not even a wrench.  Oh, and you will also need a great pair of scissors to break into the packaging.  I swear who ever made that design was a piece of work.  It takes just as long to open the package as to install the shower head.

Instructions:

1.  First remove the old shower head by unscrewing it.

                                                                2.  Put pipe tape on the threads of the pipe of the shower                                                                              head.


3.  Twist the new fitting onto the pipe.  They say you don't need tools.  You don't, but as you can see from this picture you really need to twist hard.

The rest is really simple:

4.  Twist hose to the new fitting

5.  Twist new shower head on

6.  Turn the shower on  to test for leaks

This is where the towel will come in handy.
If you need to tighten more and need a better grip, use the towel.  I may be smiling but I was using some serious muscle to get it tight.

Happy showering and home improvement.

Enjoy....I am.

Wednesday, May 9, 2012

You Really Can Tile Anything With In Reason!


Before and after Kitchen at the Beach

With in reason any solid surface can be tiled.  It has to be level and non porous.  Other than that
it is the type of material and tile you use and how you seal it after you are done.
I am known for saying that will take no time at all,  easy project don't worry about it:)
Sometimes I'm a bit off on my timing however.  This kitchen took 2 days to finish so  in my opinion that's pretty fast...maybe just not no time at all:)  My great friend and partner in remodel, Julie,  helped with this whole project.  The granite is a bit heavy and it was incredible having her help.  She is the master of detail.   She is great to work with,  we tend to think in the same direction and get great results....and a few bruises along the way,   pictures to follow:)


You can tile over Formica on a counter or a back splash and believe me removing old Formica is hard, tiring and can be very sharp.  So if it's in good shape and adhered really well leave it be.  A side note though after just doing a new tile/granite project I had to double check to see if there was good adhesion on the wall. We started and realized that the Formica was coming off... this was easy to remove,  it came off in one piece, not enough glue!
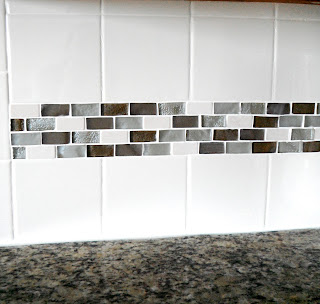
For this kitchen  I  used a combination of granite, ceramic, and glass tile.   The granite is a great product that ordered from  Oregon Marble.  It's called a mini slab.  Basically is is a huge Granite tile, 18 x 27. The front edge is finished.  You cut off the back 2 inches for a trim piece on the from of the counter. These mini slabs are a great and cost effective what to have the look of slab granite.  Using a zero grout line the way to make it look closer to slab.    It installs the same way as a tile only much faster!  A few details about granite. It's a natural stone which makes it porous,  so you have to seal it.  It just wipes on very easily.  If you don't do this your stone will stain.  And with all tile projects you need to seal your grout too,  for the same reason.  When cleaning your granite make sure to use a granite cleaner.  Something without vinegar,  like green Windex.  And make sure you don't use anything with citric acid in it.  This will etch your counter.


For the back splash I went with a simple 6 x6 ivory tile from Daltile.  Then used a beautiful glass accent piece to pull all the color in.   The great part about the glass is that it comes on a mesh sheet.  we cut it into fourths so it went along way and helped stick in our budget.
This house is at the Oregon coast so we used blues to tie the ocean feel to the house.


This was a great fun weekend project.
That was only made better by a few bottles of
wine at the end of the night I ran across this
picture,  it  sums up the great time and a
beautiful project. Of course we waited to be done
with the saw before we opened any bottles.


A few other changes we made to the kitchen.  We took out the appliance cozy, which opened up the back of the counter.  Changed all the hardware to stainless.  And put in my favorite light fixture so far.  I really just love this project.